Monday, April 22, 2013

Ocala Star Banner Interview

One huge "thank you" to the Ocala Star Banner for the fabulous article!!!

@Work: Melissa Galloway

Owner of MG Events

Published: Monday, April 22, 2013 at 4:36 p.m.
Last Modified: Monday, April 22, 2013 at 4:36 p.m


Facts

MELISSA GALLOWAY

Title: Owner of MG Events
Phone: 352-233-8759
Web: MelissaGallowayEvents.blogspot.com

How she got into the business: “I was a pre-med major, but woke up one day and it was like a light switch that went off. It was scary and I wondered, ‘What will I do?’ So I changed my major to psychology. After school, I had my twins; now they are 15 months old. I started in January, but have been doing events for friends and family for three years. I always liked doing special things for family birthdays and it just kind of snowballed into baby showers for friends.”
What she does: “I do the pretty stuff, like the decor and the centerpieces. For the Cattle Baron’s Ball I just decorated, but for past events I did plan (the event) and decorate. No event is the same, so whatever a client needs I will provide the service for them. I meet with clients to come up with ideas, themes, depending on the wedding, baby shower or birthday. I also do bridal showers, religious celebrations, rehearsals — any event.”

What sets her apart: “I have a blog. I use Pinterest and I follow (other) blogs and see things that are inspirational. I always have ideas ready so when I have an opportunity to try it with a client I can present them with options. I’m an open canvas — some people don’t know what they want and come to me and I can help them, or some people do know what they want but don’t know how to start.”

How she came to Ocala: “I was born and raised in South Africa and grew up bilingual. My mom was a pharmacist and got recruited to work in Ocala when I was 14. I didn’t really have (culture shock), but I grew up in a small private school and had the same friends since kindergarten, then transferred into a school with so many people. I stayed (in Ocala) because it was such a big move that I didn’t want to relive the experience and relearn everything — I’m happy here.”

Best part about the job: “No event is the same as the last one and there is a new challenge in every event. I enjoy the chaotic stress, especially when it is crunch time. Some people play sports; this is my outlet. I’m crafty and I was always doing projects at home before I had the kids, like scrapbooking and making cards, so now it is just on a grander scale. I pick the projects that appeal to me and invest my time to make it a priority, although my kids are still my first priority.”

How she works: “In this industry you don’t have to have a storefront. A lot of (the work) is computer work so it’s convenient to work at home. A lot of the ideas I show clients are in the computer or I am running around meeting outside vendors. I work with two caterers I would recommend because I trust them. I work with certain photographers because I know their work and I work with one florist — this industry is all about building relationships.”

What people don’t know: “It’s affordable and can be for anyone’s budget. There are misconceptions that (someone) can’t afford to have a planner for an event or wedding. My party packages start at $150 and weddings start at $1,500. Anything from selecting invitations to whole event planning — from just one item to a complete project.”

Friday, April 19, 2013

Fun Friday! FREE Mother's Day printable set!

HAPPY FRIDAY to all my readers!!! 

How about some fabulous freebies for Mother's Day?!? 

Can I just say that I LOVE this FREE Mother's Day printable set from Amanda's Parties To Go 

All you have to do is click on this link download.


Happy weekend! 
Melissa 

Thank you Amanda's Parties To Go for the fabulous Freebie!!!

FREEand Fabulous! 

More FREE and Fabulous! 

Thursday, April 18, 2013

12th Annual Cattle Barons' Ball

Oh my! Where to begin about this amazing event!

First things first... I want to send out a HUGE thank you to the American Cancer Society, the Cattle Barons' Ball board members, all the volunteers, the Ocala Hilton, my family for your support and taking care of my baby girls when I couldn't and lastly, thank you to my husband for your support and encouragement as I took on my biggest event to date!

The Cattle Barons' Ball is a fundraising event that raises funds for cancer research. This event just celebrated their 12th annual evening at the beautiful Palm Terrace Tent located at the Ocala Hilton. (Ocala, FL)

The event hosted over 230 guests!

I was honored to have my work displayed at such an incredible event for a great cause. From cutting custom table runners to hanging burlap 12 feet above the ground, to table flower arrangements to the smallest detail, I was thrilled to have had such a great opportunity to work with everyone!

Take a look at the event decor, all courtesy of MG Events.

Alternating flower arrangements with gorgeous, real, white hydrangeas! By MG Events

DIY Tin cans with burlap by MG Events

Closeup of DIY Tin cans by MG Events

Tall cylindrical vases

Elegant napkin fold for an elegant evening.

Working hard! (This is me!)

Stage for the dueling pianos! Rockin' Pianos! Highly recommended!

Tent trap covers! 

For more pictures from the event, "LIKE" our Facebook Page.... MG Events

Monday, April 15, 2013

Heirloom Brunch, more pictures

Here are a few more pictures from the Heirloom Brunch Photo Shoot.
To read the article, click on this link.


Family Times Magazine: Heirloom Brunch

This was one fabulous photo shoot set up that I did for the Family Times Magazine! The photo shoot went so well that I was honored to have TWO full pages for the shoot!!!

I was approached by the magazine to come up with something fun and unique for Mother's Day. With Pinterest being as popular as it is, it seems like every ideas has been pinned by thousands and thousands of people which makes creativity a little bit more challenging!

The idea came to me when I scouted around in my garage and saw a gorgeous antique dairy bucket. I thought to myself, "antiques", "things that have been passed down for many years"... the ideas kept rolling and rolling and it all came together in an Heirloom Brunch.

The idea behind the Heirloom brunch is for sisters, aunts, mothers, grandmothers, cousins and nieces alike to all come together to celebrate the wonderful women in their lives.
It's a celebration to honor the amazing women in their present lives as well as those that have passed and left behind their beloved china sets, silver candlesticks, engraved serving platters, etc.

Each guest is invited to bring their favorite piece or pieces of something passed down; whether it be a passed down secret family recipe or a gorgeous silver sugar bowl.

Special thanks to:
Rose Derkay and the Family Times Magazine
The Appleton Museum of Art
Stuart Pellicier, my wonderful assistant

Enjoy the article!

For more pictures from the photo shoot, click on this link.
Grab your copy at your local Publix today!

Page 16 in the April/May Issue (2013)
 
Page 17 in the April/May Issue (2013)

Saturday, April 6, 2013

MG Events: Frame within a Frame Tutorial

For this project, I was really focusing on creating something fabulous for a low dollar.
Sometimes it takes more creativity to come up with a low budget idea than doing the actual project itself!

I headed down to my favorite craft store, Hobby Lobby, where the 40% off coupon is my best friend!

I bought a duo canvas package for roughly $7.00

I scouted around, but couldn't find super affordable frames that would work for a makeover so I headed to our local Goodwill...Low and behold, these two outdated, ugly, inexpensive frames were my only option.

The best thing about making something over is that you don't look at their current color or condition; you look at the shape. You can always change color but you can't necessarily always change shape.
The frames were roughly $3.00 total.

I bought some fun acrylic paints and about a yard or so of burlap.
I made sure that I had some really good glue and I couldn't resist throwing in some thick, bright ribbon!

Step 1: 
Paint your entire canvas with a honey oat acrylic. Set your canvas aside to dry completely.

Step 2:
Get your frame ready. Make sure that it's clean and dry.
Pay attention to its shape... does it have special grooves and contour?


Step 3:
Prep your work area.
Paint a base color over your entire frame. Make sure that you get a good base coat. Let your frame dry completely.


Step 4:
Think about your accent color. This is the color that you want to show through all the layers of paint.
I wanted to have a worn, roughly sanded down look.
*** This step is important*** 
I high lighted the areas of my frame where I wanted the accent color to show with VASELINE.
If you look closely at the picture below, you will see goopy bumps all over the frame.... that's the Vaseline.


Step 5:
Paint your second layer of paint over the your entire frame and over the Vaseline.
Once your paint has dried, wipe off the goopy Vaseline layers.... your accent layer should now be visible.


Step 6:
Keep repeating your Vaseline and paint layers until you get your desired look.


Step 7:
Next, paint your glue all over your canvas and lay your burlap over your canvas.
Pull the burlap tight by evenly tugging on each side.
Wait for the canvas to dry completely.

Step 8:
Wrap the corners on your canvas with the burlap as if you were wrapping a present.
Make sure to use an adequate amount of glue to keep the corners down.

Step 9:
Measure your thick ribbon and glue it into the back side of your canvas. Make sure that both ends are even so that your art work isn't going to be hanging lopsided

Step 10: 
Add your artwork to your painted frame. 
Glue your dried frame onto your burlap canvas. 
Hang your fabulous new piece where everyone can see your "hand-i-work!"

Click on this link to see the completed project.

Handiwork... More pictures

Thank you again to Rose and the Family Times Magazine  for this wonderful photo shoot!

Thank you to my little models, Rachel and Garrett!

Click here to read the article from the magazine.
Click here for a complete DIY tutorial on making your own burlap covered frames.
Enjoy the pictures!


Hand-i-work: Family Times Magazine

Here is another fabulous project that I did for the Family Times Magazine.

Family Times approached me regarding some fun Mother's Day gift ideas that incorporated hand prints and foot prints.

I'm assuming many of my avid readers are also Pinterest followers and many of you have probably seen the great hand print/foot print art ideas on Pinterest.

I was inspired by this adorable ballerina tutu and this super cute tractor.

I wanted to add something extra to the art work to set it apart and to avoid it from becoming mundane.
I'm sure that there are lots of mommies out there who don't want to add another hand print or foot print to the box underneath their bed!

I decided to hit my favorite craft store and hunt down some fabulous accessories for this project.
I came up with the idea of having two frames.... something along the lines of a frame within a frame.

Since burlap is such a commodity these days, I wanted to incorporate it into this project.

My solution was covering a white canvass with burlap to act as the first frame and adding a second frame on top of the burlap with the art work inside it.
Most projects have a budget so I headed down to Goodwill in search of some cheap frames. I bought two frames for less than $3.00. I added some fun paint to match and glued on thick, colorful ribbon for hanging.

For a complete tutorial on creating your frame within a frame, click here.

Thank you again to Rose, Family Times Magazine , the Appleton Museum , and my little artists for all your help!

For more pictures from our photo shoot, click on this link.  

*click on the picture to enlarge it*


Friday, April 5, 2013

Fun Friday!

What sounds like fun to do over the weekend?
How about trying out a fabulous new recipe? Something easy and yummy with a little bit of zest!

Since the weather should be nice over the weekend, call a few friends for a laid back BBQ.
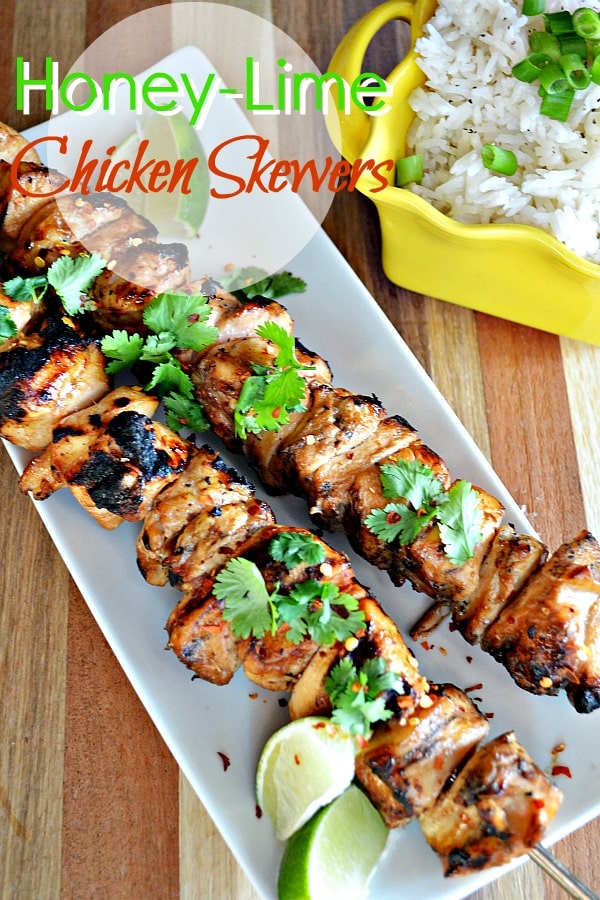
Grab a few ingredients from the grocery store and try out that Pinterest Sangria recipe to go along with your Honey-Lime Chicken Skewers!

*I've made this recipe several times and it's fabulous! Don't be shy about the cilantro! Make some extra to freeze. Take them out for dinner and bake them in the oven when you've had a crazy day at work!


If you're using bamboo skewers, soak your sticks in water for at least 5 minutes. Cut chicken into large chunks, and skewer. Allow to marinate for at least 1 hour.

*Marinading for one hour isn't necessary but it makes your chicken extra yummy and juicy with amazing flavor* 

Ingredients:
  • 3 tablespoons soy sauce
  • 2 tablespoons honey
  • 1 tablespoon vegetable oil
  • juice of one lime
  • 2 garlic cloves, minced
  • 1-2 teaspoon Tabasco 
  • red pepper flakes, to taste
  • 2 tablespoon cilantro
  • 1 pound skinless, boneless chicken breasts
Instructions:
  1. In a small bowl, combine your ingredients, through the cilantro. Mix thoroughly.
  2. Pour marinade over chicken breasts and turn to coat. Cover and allow to marinate for at least 1 hour.
  3. Grill on medium high heat for 6 to 8 minutes per side, until juices run clear.

"Mompreneur": By Rose Derkay, Family Times Magazine

I am so honored to have been asked to be part of this wonderful article in the Family Times Magazine. 

Rose Derkay, Owner and Editor of the magazine contacted me and asked me to be part their April/May issue. She was looking for "mompreneur's."
Rose wanted to celebrate moms for this upcoming Mother's Day and she wanted to feature moms that have successful businesses from home.

I was so thrilled that she asked me to be a part of this photo shoot and I was also privileged to have met four other amazing, talented and successful women!
 
Take a peak at the article below.
*Click on the picture to zoom for a bigger view*

Thank you again, Rose!

*Pick up your copy of the Family Times Magazine at your local Publix supermarket*


Monday, April 1, 2013

High Top Tables Inspiration

I hope that everyone had a blessed and happy Easter this past weekend!

I know that we loved spending some quality time with our twin girls and with our families. The weather was gorgeous and it was a blast to see our 14 month old girls running around, looking for their Easter Eggs.

It's April!
That means that the Cattle Barons' Ball that I'm working on is only 12 days away!
Learn more about the event at Ocala Cattle Barons' Ball 

I'm planning on having some high top tables outside for our guests. It's always nice to be able to put your drink down for a second while talking to fellow guests or grabbing a business card out of your pocket/purse.
High top tables can look very misplaced if their layout isn't positioned correctly with the rest of the decor.

I have some inspiration below on how to place the high top tables at this event.


I love how these tables are grouped in three's. It makes the tables look like an elegant ensemble instead of something that is just taking up space.
This idea will be perfect in front of the two separate bar areas at the event.

I will place them off center from the bar so that people can be close enough to the bar area without interfering with traffic flow.

I will be keeping the white tablecloths but will replace the fuchsia bow with the rustic chic burlap color scheme that we are going for. I will also add a small runner on top of the table to mimic the big, round dinner tables. For a finishing touch, I'll add a miniature arrangement to compliment the rest of the event decor.

Happy Monday ya'll!!!
Melissa